# 从一个demo浅谈PWA
# 一、什么是PWA
PWA是一个英文的缩写——Progressive Web Apps。翻译成中文就是渐进式Web应用。它是指用现代的Web API以及传统的渐进增强的网页开发策略来创建跨平台的Web应用程序。PWA的目的就是无限的靠近原生应用——android以及IOS应用。这就表明PWA的终极目的就是增强用户体验。
# PWA的优势
PWA具有以下几点优势:
- 可被发现的:由于PWA本质上是一个web应用,所以他可以被搜索引擎抓取到。
- 易安装:PWA虽然本质上是一个web应用,但是通过一些手段,可以把这个web应用像APP一样,添加到主屏。但却不用下载进行安装。
- 可链接:既然PWA是一个web,就可以使用一个url链接到它。
独立于网络(这一点是核心):这一点是PWA的核心,简单来说就是使用Service Worker来进行离线缓存,使的应用在无网络的情况下也能正常的访问,这就和本地应用相似了。- 网络安全性:PWA由于使用了Service Worker ,那么必须在HTTPS的协议下或者本地开发才能实现。
- 可重用(可重入):通过Service Worker的
推送和通知的功能,让PWA可重用。 - 响应式:网页的响应式开发(个人觉得这个平平无奇)。
# 关于渐进增强
渐进增强是一种古老的网页设计策略,到现在仍然适用,强调的是网页的可访问性。渐进增强使用Web技术以分层的方式,允许所有人访问网页的基本内容和功能,使用任何浏览器或互联网连接,同时还给更先进的浏览器软件或更大的带宽提供了这些页面的一个增强版本。
# 二、为什么要使用PWA
使用PWA是因为PWA的优势明显,在现在互联网的发展中,用户的体验是最重要的,抓不住用户就没钱赚。我们可以使用很小的开发成本来实现PWA的核心或者重要的特性,来换取巨大的优势:
- 减少应用安装后的加载时间, 通过 Service Workers 来进行缓存, 以此来节省带宽和时间。
- 当应用有可用的更新时,可以更新值发生变化的部分。相对比于原生的应用,如果有更新就要重新发布,重新的下载安装。
- PWA可以被添加到主屏上,使用起来和原生应用差别无二。
- 通过消息通知和推送功能,可以与用户保持连接,提高转化率。
# 浏览器支持情况
现代浏览器普遍支持PWA,移动端的浏览器全部支持PWA的核心——service worker。
# 有谁在用?
- 印度最大的电子商务网站 —— Flipkart Lite
- couponmoto
- 推特
# 三、如何开发一个PWA——讲解一个示例应用程序
我们不需要关注这个demo是个什么项目,只需要关注PWA的实现。现在实现PWA最流行的方式是以下两种:
APP Shell方式- Stream方式
下面我们重点讲解APP Shell方式,我们要讲解的例子就是使用APP Shell方式实现的PWA。
# APP Shell
我们单独看shell这个英文单词,它的中文意思是壳,我们写的shell脚本的shell其实也是壳的意思。App Shell的概念直译过来就是APP的壳。是尽快加载尽可能小的用户界面,这种界面一般不存在实体的内容而是一些公共的UI,或者页面的大体框架,加载完成之后使用Service Worker缓存APP Shell。然后页面的主体内容则是使用JS脚本进行加载,然后对主体内容的资源进行缓存。
这种方式,加载的速度会很快,用户的体验就非常良好。用户会立即看到页面而不是长时间的空白页(加载时间)。非第一次访问的时候,就是从缓存中取出了。
下面我们就看看这种APP Shell方式来实现的PWA。
# 实例的结构:
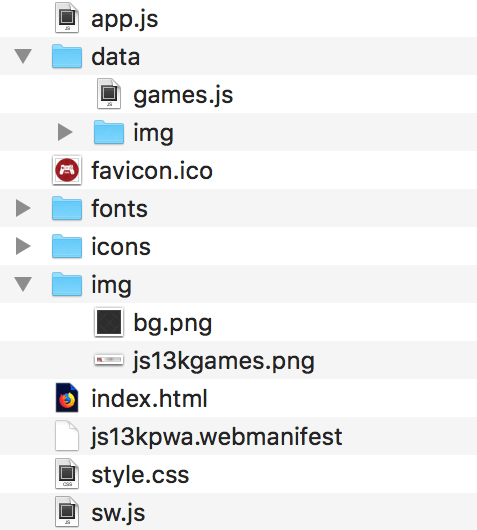
# 项目分析
我们先来看index.html:
<!DOCTYPE html>
<html lang="en">
<head>
<meta charset="utf-8">
<title>js13kGames A-Frame entries</title>
<meta name="description" content="A list of A-Frame entries submitted to the js13kGames 2017 competition, used as an example for the MDN articles about Progressive Web Apps.">
<meta name="author" content="end3r">
<meta name="theme-color" content="#B12A34">
<meta name="viewport" content="width=device-width, initial-scale=1">
<meta property="og:image" content="icons/icon-512.png">
<link rel="shortcut icon" href="favicon.ico">
<link rel="stylesheet" href="style.css">
<link rel="manifest" href="js13kpwa.webmanifest">
<script src="data/games.js" defer></script>
<script src="app.js" defer></script>
</head>
<body>
<header>
<p><a class="logo" href="http://js13kgames.com"><img src="img/js13kgames.png" alt="js13kGames"></a></p>
</header>
<main>
<h1>js13kGames A-Frame entries</h1>
<p class="description">List of games submitted to the <a href="http://js13kgames.com/aframe">A-Frame category</a> in the <a href="http://2017.js13kgames.com">js13kGames 2017</a> competition. You can <a href="https://github.com/mdn/pwa-examples/blob/master/js13kpwa">fork js13kPWA on GitHub</a> to check its source code.</p>
<button id="notifications">Request dummy notifications</button>
<section id="content"></section>
</main>
<footer>
<p>© js13kGames 2012-2018, created and maintained by <a href="http://end3r.com">Andrzej Mazur</a> from <a href="http://enclavegames.com">Enclave Games</a>.</p>
</footer>
</body>
</html>
2
3
4
5
6
7
8
9
10
11
12
13
14
15
16
17
18
19
20
21
22
23
24
25
26
27
28
29
30
31
这里我们要注意的是所谓的APP Shell就是除了#content的一切。HTML中引入了两个JS文件,这两个JS文件一个是游戏内容的JS文件——这个文件里面是对各种游戏的描述,和业务有关,不属于核心。另一个则是核心JS文件app.js。
我们来看一下app.js中的核心逻辑:
// Generating content based on the template
const template = `<article>
  <img src='data/img/placeholder.png' data-src='data/img/SLUG.jpg' alt='NAME'>
  <h3>#POS. NAME</h3>
  <ul>
  <li><span>Author:</span> <strong>AUTHOR</strong></li>
  <li><span>Twitter:</span> <a href='https://twitter.com/TWITTER'>@TWITTER</a></li>
  <li><span>Website:</span> <a href='http://WEBSITE/'>WEBSITE</a></li>
  <li><span>GitHub:</span> <a href='https://GITHUB'>GITHUB</a></li>
  <li><span>More:</span> <a href='http://js13kgames.com/entries/SLUG'>js13kgames.com/entries/SLUG</a></li>
  </ul>
</article>`;
let content = '';
// 遍历games数组,生成content的html片段
for (let i = 0; i < games.length; i++) {
  let entry = template.replace(/POS/g, (i + 1))
    .replace(/SLUG/g, games[i].slug)
    .replace(/NAME/g, games[i].name)
    .replace(/AUTHOR/g, games[i].author)
    .replace(/TWITTER/g, games[i].twitter)
    .replace(/WEBSITE/g, games[i].website)
    .replace(/GITHUB/g, games[i].github);
  entry = entry.replace('<a href=\'http:///\'></a>', '-');
  content += entry;
}
// 填充到content元素中去
document.getElementById('content').innerHTML = content;

// 判断当前的浏览器是否支持Service Worker
if ('serviceWorker' in navigator) {
  // 注册service worker,注册的入口为/pwa-examples/js13kpwa/sw.js
  // sw.js完成了所有和离线缓存有关的所有操作
  navigator.serviceWorker.register('/pwa-examples/js13kpwa/sw.js');
}

// Requesting permission for Notifications after clicking on the button
const button = document.getElementById('notifications');
// 点击按钮获取用户对于推送和通知的授权
button.addEventListener('click', () => {
  Notification.requestPermission().then((result) => {
    if (result === 'granted') {
      randomNotification();
    }
  });
});

// Setting up random Notification
// 创建通知的代码,随机展示一个游戏的内容。每隔30秒通知一次。
function randomNotification() {
  const randomItem = Math.floor(Math.random() * games.length);
  const notifTitle = games[randomItem].name;
  const notifBody = `Created by ${games[randomItem].author}.`;
  const notifImg = `data/img/${games[randomItem].slug}.jpg`;
  const options = {
    body: notifBody,
    icon: notifImg,
  };
  new Notification(notifTitle, options);
  setTimeout(randomNotification, 30000);
}

// 图片的懒加载
const imagesToLoad = document.querySelectorAll('img[data-src]');
const loadImages = (image) => {
  image.setAttribute('src', image.getAttribute('data-src'));
  image.onload = () => {
    image.removeAttribute('data-src');
  };
};
// 使用IntersectionObserver API进行图片出现在屏幕的判断,实现懒加载。
if ('IntersectionObserver' in window) {
  const observer = new IntersectionObserver((items) => {
    items.forEach((item) => {
      if (item.isIntersecting) {
        loadImages(item.target);
        observer.unobserve(item.target);
      }
    });
  });
  imagesToLoad.forEach((img) => {
    observer.observe(img);
  });
} else {
  imagesToLoad.forEach((img) => {
    loadImages(img);
  });
}
2
3
4
5
6
7
8
9
10
11
12
13
14
15
16
17
18
19
20
21
22
23
24
25
26
27
28
29
30
31
32
33
34
35
36
37
38
39
40
41
42
43
44
45
46
47
48
49
50
51
52
53
54
55
56
57
58
59
60
61
62
63
64
65
66
67
68
69
70
71
72
73
74
75
76
77
78
79
80
81
82
83
84
85
86
87
我们可以发现PWA在实现是一个综合的技术方案,包括但不限于以下几点:
- App Shell的思想
- service worker 离线缓存
- 通知和推送
- 网页的性能优化
这其中最核心的就是使用Service Worker实现离线缓存。在app.js中我们可以看到唯一和service worker的代码如下:
// 判断当前的浏览器是否支持Service Worker
if ('serviceWorker' in navigator) {
  // 注册service worker,注册的入口为/pwa-examples/js13kpwa/sw.js
  // sw.js完成了所有和离线缓存有关的所有操作
  navigator.serviceWorker.register('/pwa-examples/js13kpwa/sw.js');
}
2
3
4
5
6
这里也就运用了渐进增强的开发策略,如果用户的浏览器不支持serviceWorker那么就直接获取远端服务器上的,这样并不会影响功能的使用。这段代码实际上是为serviceWorker做了注册。注册的入口在sw.js中。了解之后,我们去看一下sw.js:
// 引入 data/games.js 脚本
self.importScripts('data/games.js');

// 本地存储的key
const cacheName = 'js13kPWA-v1';
// app shell,即应用的简单UI,供缓存使用。
const appShellFiles = [
  '/pwa-examples/js13kpwa/',
  '/pwa-examples/js13kpwa/index.html',
  '/pwa-examples/js13kpwa/app.js',
  '/pwa-examples/js13kpwa/style.css',
  '/pwa-examples/js13kpwa/fonts/graduate.eot',
  '/pwa-examples/js13kpwa/fonts/graduate.ttf',
  '/pwa-examples/js13kpwa/fonts/graduate.woff',
  '/pwa-examples/js13kpwa/favicon.ico',
  '/pwa-examples/js13kpwa/img/js13kgames.png',
  '/pwa-examples/js13kpwa/img/bg.png',
  '/pwa-examples/js13kpwa/icons/icon-32.png',
  '/pwa-examples/js13kpwa/icons/icon-64.png',
  '/pwa-examples/js13kpwa/icons/icon-96.png',
  '/pwa-examples/js13kpwa/icons/icon-128.png',
  '/pwa-examples/js13kpwa/icons/icon-168.png',
  '/pwa-examples/js13kpwa/icons/icon-192.png',
  '/pwa-examples/js13kpwa/icons/icon-256.png',
  '/pwa-examples/js13kpwa/icons/icon-512.png',
];
// 需要缓存的图片,这属于动态加载的内容,具体可见app.js。
const gamesImages = [];
for (let i = 0; i < games.length; i++) {
  gamesImages.push(`data/img/${games[i].slug}.jpg`);
}
// 需要缓存的全部内容
const contentToCache = appShellFiles.concat(gamesImages);

// Installing Service Worker
// 声明周期的install事件
/**
 * instal事件:
 * 初始化缓存,把请求回来的需要缓存的资源缓存在浏览器中。
 */
self.addEventListener('install', (e) => {
  console.log('[Service Worker] Install');
  e.waitUntil((async () => {
    const cache = await caches.open(cacheName);
    console.log('[Service Worker] Caching all: app shell and content');
    await cache.addAll(contentToCache);
  })());
});

// Fetching content using Service Worker
// 拦截请求
self.addEventListener('fetch', (e) => {
  e.respondWith((async () => {
    const r = await caches.match(e.request);
    console.log(`[Service Worker] Fetching resource: ${e.request.url}`);
    if (r) return r;
    const response = await fetch(e.request);
    const cache = await caches.open(cacheName);
    console.log(`[Service Worker] Caching new resource: ${e.request.url}`);
    cache.put(e.request, response.clone());
    return response;
  })());
});
2
3
4
5
6
7
8
9
10
11
12
13
14
15
16
17
18
19
20
21
22
23
24
25
26
27
28
29
30
31
32
33
34
35
36
37
38
39
40
41
42
43
44
45
46
47
48
49
50
51
52
53
54
55
56
57
58
59
60
61
62
63
64
我们前面一直在说Service Worker那么service worker到底是什么?
# Service Worker
所谓的Service Worker就是浏览器和网络之间的虚拟代理,解决了如何正确缓存网站资源并使其在离线时可用的问题。
Service Worker运行在一个独立线程上,独立于网页JS的主线程。Service Worker无权访问DOM结构,Service Worker的API是非阻塞的,可以在不同的上下文中传递和接收消息。可以给Service Worker分配任务,通过promise的方式来接收结果。
由于Service Worker功能过于强大,所以只能在安全的上下文中运行也就是HTTPS或者本地的开发环境(localhost)。
# Service Worker的生命周期
在介绍Service Worker的声明周期之前,要先交代一下e.waitUntil和caches:
- e.waitUntil:Service Worker 会等到
waitUntil里面的代码执行完毕之后才开始安装。它返回的是一个 Promise——因为安装过程可能需要一些时间,而我们必须等待它完成。 caches是一个特殊的CacheStorage对象,它能在 Service Worker 指定的范围内提供数据存储的能力。
在app.js中注册完成之后,会自动执行sw.js中的逻辑,触发Service Worker的声明周期函数。Service Worker的声明周期分为安装、激活、更新、删除。
安装——install
在install事件的监听函数中,我们可以初始化缓存,并天下离线缓存需要使用的文件。要想初始化缓存并添加缓存文件,我们需要先设置一个缓存的名字(key),也就是sw.js中的const cacheName = 'js13kPWA-v1';,这个cacheName会在调用caches.open方法时作为参数传递,作用是创建一个名为js13kPWA-v1的缓存空间。contentToCache则是需要缓存的所有文件,要当做参数传给cache.addAll方法,这样就可以把需要缓存的文件全部添加到了缓存空间中。
激活——activate
用来删除已经不需要的文件。
拦截fetch(重点)
监听的fetch事件离线缓存的重点、核心。fetch在每次发起HTTP请求的时候被触发,fetch事件允许开发者拦截请求并做出自定义的响应。下面我们单独分析这一段核心代码(为了方便阅读,我会以注释的形式分析代码):
self.addEventListener('fetch', (e) => {
  // 接管请求和响应
  e.respondWith((async () => {
    // 检查caches中有没有当前请求的缓存数据
    const r = await caches.match(e.request);
    console.log(`[Service Worker] Fetching resource: ${e.request.url}`);
    // 如果缓存存在,直接返回缓存数据。
    if (r) return r;
    // 如果缓存不存在,直接请求网络服务器中的数据。
    const response = await fetch(e.request);
    // 然后把请求结果缓存起来
    const cache = await caches.open(cacheName);
    console.log(`[Service Worker] Caching new resource: ${e.request.url}`);
    // 把请求的数据,缓存起来。
    cache.put(e.request, response.clone());
    // 返回请求回来的数据
    return response;
  })());
});
2
3
4
5
6
7
8
9
10
11
12
13
14
15
16
17
18
19
上述这段代码的重点在于
e.respondWith方法,这个方法会接管请求和响应,作为应用和服务器之间的代理服务,我们会获取到每一个请求,并随意做出自定义的响应。
更新
如果我们需要有一个新的版本发布,同样的要缓存新的数据,那么我们应该怎么办?其实这个很容易,关键就在于cacheName中的版本号,直接把'js13kPWA-v1'的v1改成v2。这样的话就会在浏览器中存在一个新的缓存空间,应用就会依赖这个新的缓存空间。
# service worker的其他用途
可以把复杂的运算在service worker中抽离出来。
在service worker中做资源的预加载。
# 如何让PWA易安装
对于传统的APP,我们如果想使用必须要下载安装,然后才能把应用添加到主屏上。然而PWA则使用了一种更加方便的形式只需要满足线面这几个条件就可以:
- 一份填写正确的网页清单
- 在HTTPS上下文中
- 主屏图标
- 注册号service worker
网页清单一般以<projectName>.webmanifest为文件名,文件内容为json类型(但是后缀名一般为 .webmanifest):
{
    "name": "js13kGames Progressive Web App", # 应用全名
    "short_name": "js13kPWA", # 显示在主屏上的名字
    "description": "Progressive Web App that lists games submitted to the A-Frame category in the js13kGames 2017 competition.", # 应用描述
    "icons": [  # 应用的图标
        {
            "src": "icons/icon-32.png",
            "sizes": "32x32",
            "type": "image/png"
        },
        // ...
        {
            "src": "icons/icon-512.png",
            "sizes": "512x512",
            "type": "image/png"
        }
    ],
    "start_url": "/pwa-examples/js13kpwa/index.html", # 应用的启动页
    "display": "fullscreen",  # 应用显示的方式
    "theme_color": "#B12A34",	# 主题色
    "background_color": "#B12A34" # 背景色
}
2
3
4
5
6
7
8
9
10
11
12
13
14
15
16
17
18
19
20
21
22
这样的话在使用移动设备浏览器访问应用的时候,就会弹出安装提示,用户如果允许安装,就可以把应用添加到主屏幕,这是移动设备浏览器自带的功能。
# 推送和通知使得PWA可重用
PWA可以通过通知和推送让用户参与进来,提高转化率。随时提供新的内容,使得PWA可重用。但是通知和推送的功能都需要用户授权,建议点击按钮出提示框,让用户选择授权与否:
var button = document.getElementById("notifications");
button.addEventListener('click', function(e) {
    Notification.requestPermission().then(function(result) {
        if(result === 'granted') {
            randomNotification();
        }
    });
});
2
3
4
5
6
7
8
用户授权之后我们就可以创建通知了:
function randomNotification() {
    var randomItem = Math.floor(Math.random()*games.length);
    var notifTitle = games[randomItem].name;
    var notifBody = 'Created by '+games[randomItem].author+'.';
    var notifImg = 'data/img/'+games[randomItem].slug+'.jpg';
    var options = {
        body: notifBody,
        icon: notifImg
    }
    var notif = new Notification(notifTitle, options);
    setTimeout(randomNotification, 30000);
}
2
3
4
5
6
7
8
9
10
11
12
这段代码会每过30秒创建一个通知。推送比较复杂一点,并且这个技术还不成熟。这里不赘述了,有兴趣的话可以参阅文档。
# 文件的懒加载
PWA注重的是用户体验,所以性能问题时必须要解决的问题,如果一个应用要加载的图片太多,加载的速度就会很慢,这时候我们可以使用懒加载的方式 ,加上图片的占位符可以一定程度上提升应用的性能,保证用户体验。
# 总结
这就是PWA实现上的内容,可能这些还远远不够,开发者可以通过对自己项目的分析选择合适的技术方案来实现。
← javascript & QA 文章收藏 →